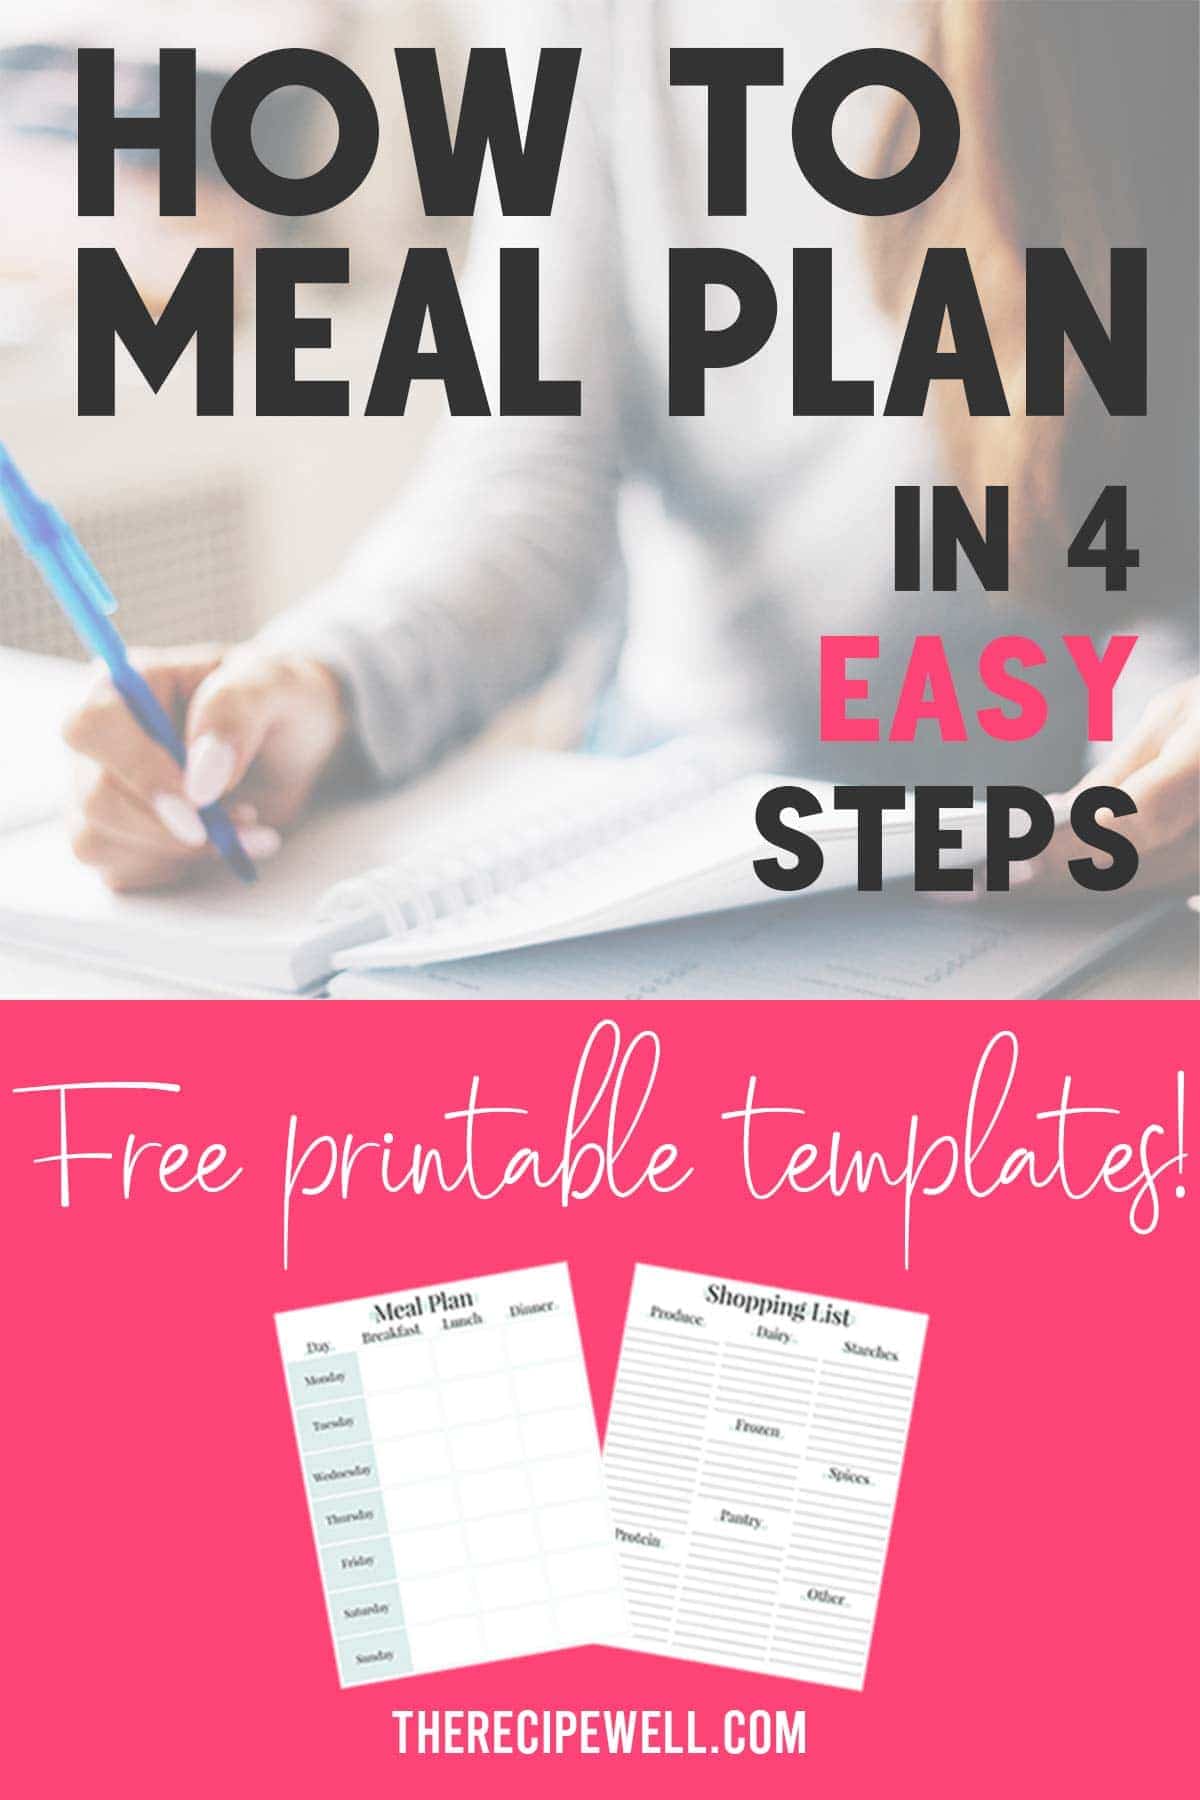
How to Meal Plan in 4 Easy Steps
This post may contain affiliate links. As an Amazon associate, I earn from qualifying purchases. Read our full disclosure statement.

If you’re not sure where to start with meal planning, read on to learn exactly how I plan my family’s meals for the week!
One of my main goals with The Recipe Well is to help people improve their health by preparing and eating more meals at home. A big part of being able to cook more is learning how to meal plan.
This guide to meal planning can work for most people. I’ve been following this approach through so many phases of my life: young/single professional, university student, married without kids, and as a parent with a full-time corporate job. This process works.
What this guide is NOT: a specific set of recipes, wrapped up in a bow, that you might follow for a week or two and then stop because it takes too much time. No my friend, I’m going to teach you how to make your own meal plans, that will work for your family’s tastes, your kitchen tools and your budget.
As an aside, if you have a medical condition that has specific dietary requirements, I do not suggest using the process outlined below, as you likely need to be aware of the amounts of specific nutrients in the foods you choose. Please consult with a dietitian or other qualified medical professional to create a tailored meal plan that suits your needs.
The four key steps of meal planning
- Decide which meals to plan ahead.
- Find and save recipes that fit the time you have available to cook.
- Make your grocery list.
- Shop!
How to Meal Plan
Let’s start with the objective: eating more home-cooked meals. We’re not aiming for 100% made from scratch (unless you want to, of course). At my house, time and convenience are factors, too, so we supplement with takeout once a week and some prepared foods. You decide what split you’re comfortable with for your family.
The example below assumes you’re meal planning for the full work week. The number of days is totally up to you. This process works just as well if you’re planning out 3 days at a time.
Step One: Decide which meals you will plan ahead
I suggest you start with the meal you struggle with the most, then add other meals or snacks as you get more comfortable.
Dinner
At our house, dinner tends to be the hardest meal to get on the table, so I plan out what we’ll have Monday through Thursday. Friday is usually the day I take off from cooking (we’ll do takeout or an easy freezer meal) and the weekends are a lot more relaxed, so we have time to decide what we want to eat on those days.
This means I need to plan ahead for four meals. I try to make at least one of these meals something that will have lots of leftovers, so we can eat it for two nights or use it for lunches. Casseroles, chilis, soups and stews are all good candidates for this.
I also look at which nights I will have time to cook vs. the nights that need to be quick. This will help you decide on the type of recipe to choose. Quick nights call for 30-minute meals or meals that are made ahead and reheated.
Breakfast and Lunch
Now that my older daughter is eating breakfast at home before school (she used to eat at her daycare), I also try to prep one breakfast item ahead of time, like muffins or baked oatmeal (like this one or this one), so mornings will be faster.
In general, we keep easy items on hand for breakfast and lunch. For breakfast, the girls really enjoy foods like cereal, toast and bagels (anything beige haha), but we always round out the meal with fresh fruit and the occasional yogurt. My go-to healthy breakfasts are a high-protein smoothie or a make-ahead omelette filled with vegetables.
Lunch is leftovers, easy bento-style lunches for the kids (carb + protein + veg and fruit – nothing fancy) and my husband will buy his lunch a few days a week at the office.
So basically, breakfast and lunch are a plan without a plan. I’m generally not using specific recipes for these meals, but that might be different for you!
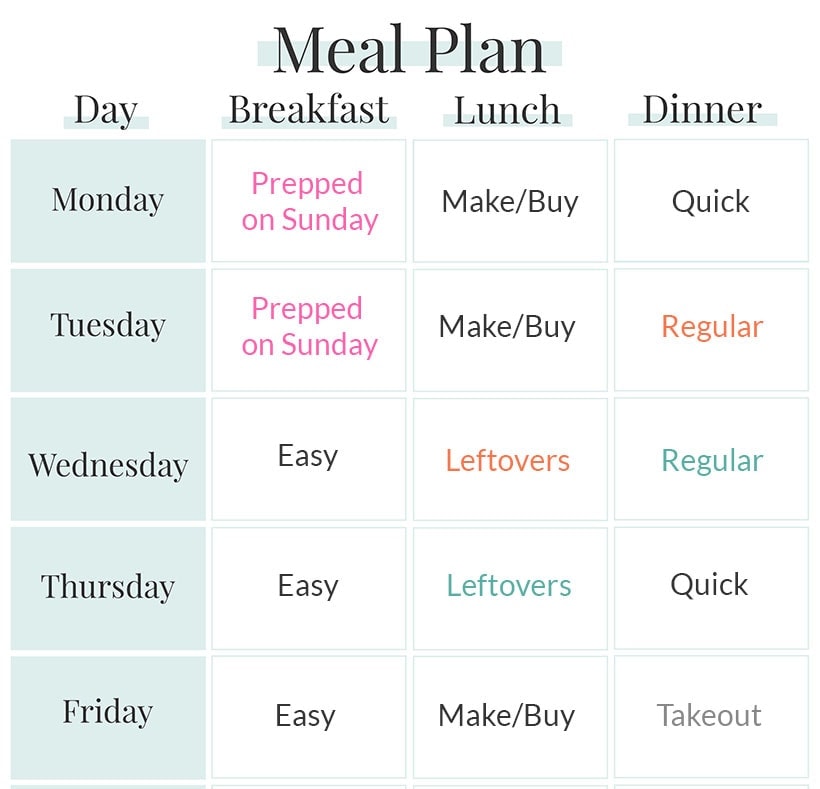
Meal plan overview for the week
Here’s an example of what the week could look like:
Step Two: Find and save recipes
This is where the fun begins! It’s also the step that will take you the longest the first few times you meal plan, but it will get faster and easier each week. The trick is to keep a running list of the recipes. Over time, you’ll have a list of 30-40 recipes (or more!) that you can come back to quickly to add to your meal plan.
To create this list, I use a free app called Wunderlist. [UPDATE December 2019: The app is owned by Microsoft and is being transitioned to Microsoft To Do. It seems to have all the same features and it’s still free!] Each week I add the names of the recipes that I plan to make, or I scan previous entries and select the ones I want to make again using a star. Adding a star brings the item to the top of the list for easy reference.
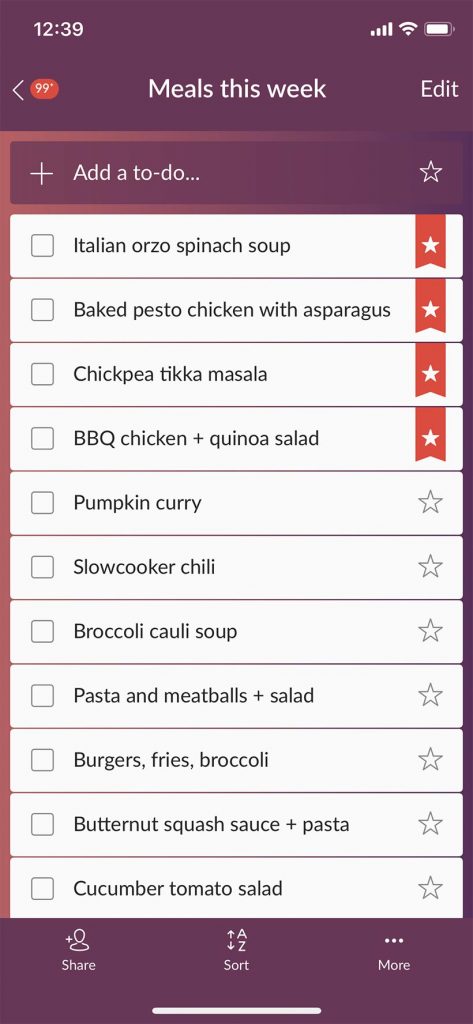
If you don’t want to use Microsoft To Do, you can use any list or notepad app, a spreadsheet or even a handwritten list in a notebook. No matter the format, the key is to save the list for reference later. This list is what’s going to save you time in the long run!
What recipes to choose
From the meal plan chart above, I know that I need two quick dinners and two “regular” dinners, so those are the types of recipes I will pick. Pay attention to the total cook time of the recipes and watch out for additional steps that might not be included in the time (like soaking). Other considerations might be:
- What vegetables and fruit are in season?
- What items are on sale at the store?
- Do I already have ingredients that need to be used before they expire?
- Do I have any meal prep meals in the freezer that I can pull out?
Let’s say I have family-size portion of soup available in the freezer from a double batch I made a few weeks ago. I can pull this out of the freezer and put it in the refrigerator the night before we plan to eat it. There’s one quick dinner planned. And perhaps chicken breast is on sale at my grocery store. Now, I need to find one more quick recipe and two “regular” recipes and at least one recipe should use chicken breast.
Where to find recipes
Google. This probably goes without saying, but Google is the easiest way to search for recipes, especially if you’re trying to find recipes that use certain ingredients.
Pinterest. Pinterest is also a great way to find recipes and probably my favourite. It’s a visual search engine, so you can type in “easy chicken recipe” and you’ll be served up lots of options in photo form. You can also follow food bloggers on Pinterest to see their recipes on your feed. I’m on Pinterest – follow along for ideas!
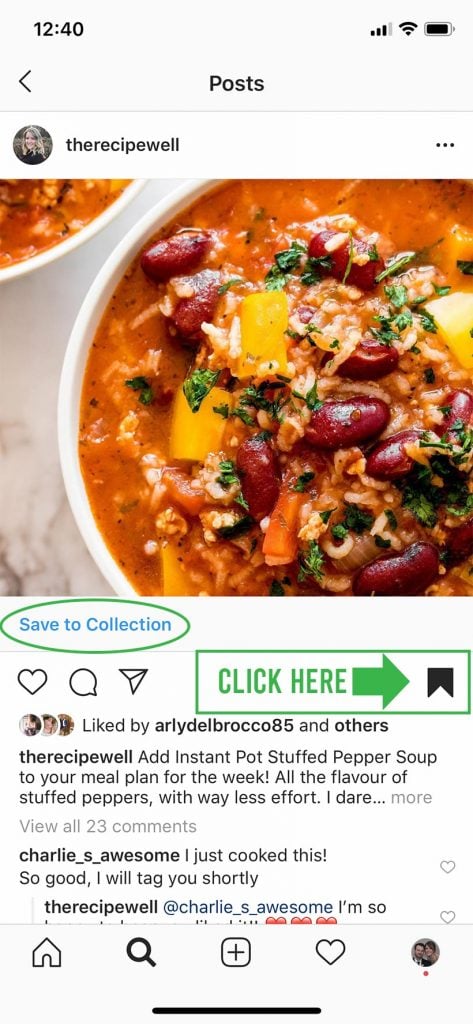
Instagram. Instagram is full of recipe inspiration. I’m a foodie and love beautiful food photography, so my IG feed consists mainly of edible items (and pictures of my friends’ kids, of course). Follow your favourite bloggers (hint hint) and you can “save” photos to go back to them later. You can create collections within Instagram, so I have a “To Make” collection where I save recipes for later. I eventually Pin the link because I find it’s faster to get back to the recipe that way.
Facebook. Facebook can also be a source of recipes. Most blogs have pages where they share their recipes and you can also find recipe groups that will provide lots of great ideas (for example, there are lots of Instant Pot groups for people to share their successful recipes). We have a group for sharing Easy and Healthy recipes. Join us!
Food sharing websites. There are websites like Foodgawker, Finding Vegan and Fridgg that showcase recipes from around the web.
Cookbooks. Of course, you may also be like me and have a ton of cookbooks. I have some favourite cookbooks, where I know every recipe will turn out perfectly.
How to organize your recipes
For online recipes, I tend to use Pinterest to create boards for different meals (Weeknight Meals, Soups and Stews, Breakfast etc.), but you could also create a bookmark folder in your internet browser to save all the links in one place. If you’re old school like some of my friends (no judgment! haha), you can print your favourite recipes and keep them in a binder.
For my cookbooks, I use small sticky notes to mark my favourites so I can find them easily. I also save hardcopy family recipes in a binder next to my cookbooks.
Step Three: Make your grocery list
Once you know the recipes you want to make for the week, simply review the ingredients for each recipe to see if you already have what you need, or if you need to add it to your grocery list.
Again, I use Microsoft To Do to make my grocery list. I love that I can tick off items as I find them in the store and they disappear from the list. So satisfying. I also create separate lists for different stores: one for my regular grocery store, one for Walmart and one for Costco (I’ve learned over time where items tend to be cheapest). I share these lists with my husband, so we can both update them real time. Whoever goes to the store will have the list on hand.
In addition to the ingredients I need for the recipes, I scan my cupboards and refrigerator to see what else I might need for the easy lunches and breakfasts (staple items like fruit, yogurt, milk, school-safe snacks etc.). Et voila! The grocery list is done.
If you prefer to write your lists on paper, sign up here to grab my Shopping List Template!
Step Four: Shop!
The biggest tip I have for this step: stick to your grocery list! Only buy the items for your planned recipes or that keep your pantry stocked. You’ll reduce food waste and reduce your food bill!
You’ll notice from the previous step that I have lists for different stores. This doesn’t mean I’m running around to three stores every week (some people may have time to do this, but I just don’t). We go to Walmart about once a month and Costco every two weeks. In between the trips, I’m updating my lists for these stores as I run low on the items I normally buy, mostly pantry and freezer items. My weekly shop at the grocery store fills in the perishable items and food I can’t find in bulk.
How to Meal Plan: Summed Up
So that’s it! I’ve given you a ton of detail on the process I use to meal plan each week. I know it can be overwhelming to start, but trust me, meal planning gets easier the more that you do it. Your wallet and your health will thank you.
To recap the four key steps:
- Pick the meals you will plan ahead. Start with the meal that gives you the most trouble.
- Find recipes that fit the time you have available to cook.
- Create a grocery list, based on your chosen recipes and what you already have on hand.
- Shop!
I hope you find this post helpful! Let me know in the comments if you have any of your own meal planning tips to share.
Be sure to check out this post all about meal prep!
Meal Planning Resources
- Microsoft To Do app
- The Recipe Well Pinterest
- Easy and Healthy Recipes Facebook Community
- Bento lunch box cheat sheet

Hey, I’m Laura!
Creator of The Recipe Well
If you’re looking for easy meals and Instant Pot recipes, you’re in the right place! I use my nutrition degree to create simple, approachable recipes that will help you find your happy place in the kitchen.