Instant Pot Pumpkin Cheesecake
This post may contain affiliate links. As an Amazon associate, I earn from qualifying purchases. Read our full disclosure statement.
Pin this recipe!
Instant Pot Pumpkin Cheesecake is basically pumpkin pie in cheesecake form. It’s the perfect Thanksgiving dessert. You’ll wow your guests with this recipe!
If you’re looking for more pumpkin treats, you might also like my Almond Flour Pumpkin Bread with cream cheese glaze!
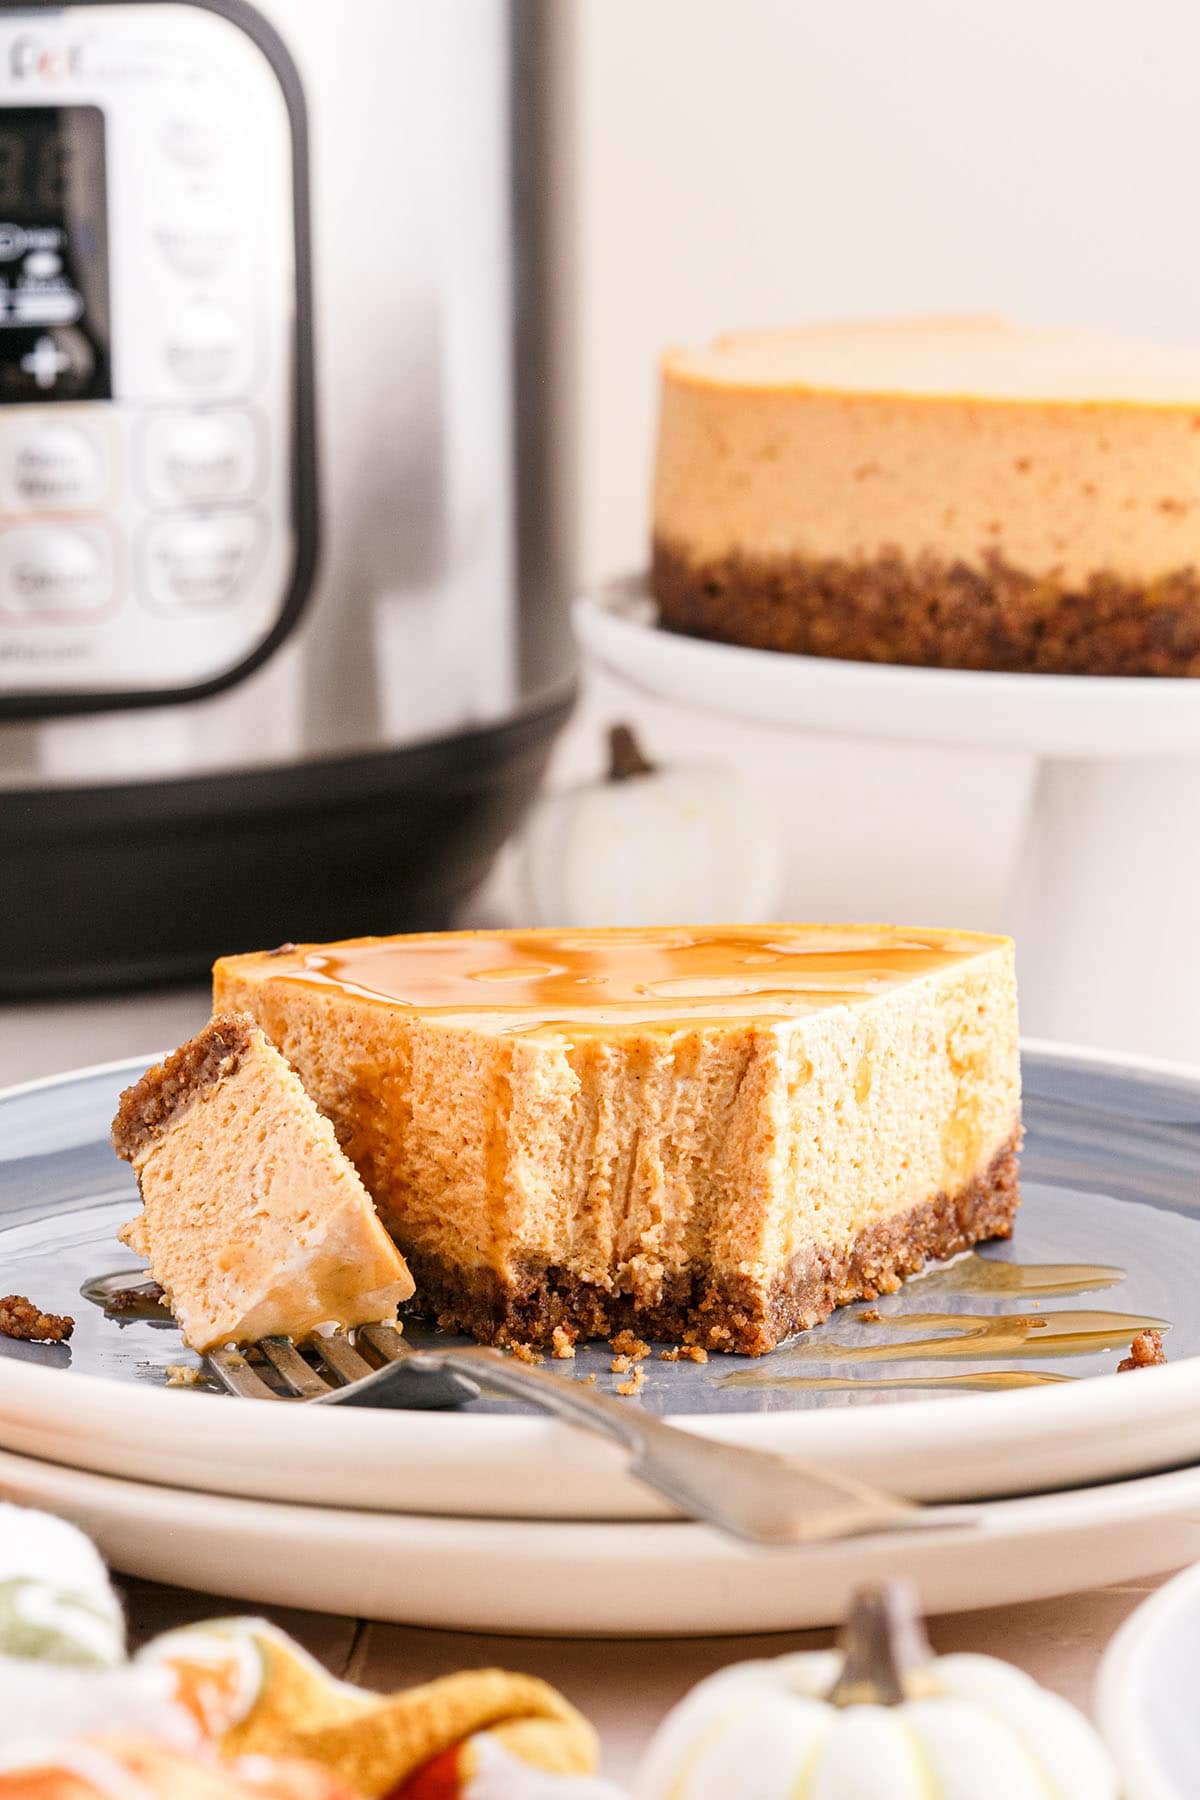
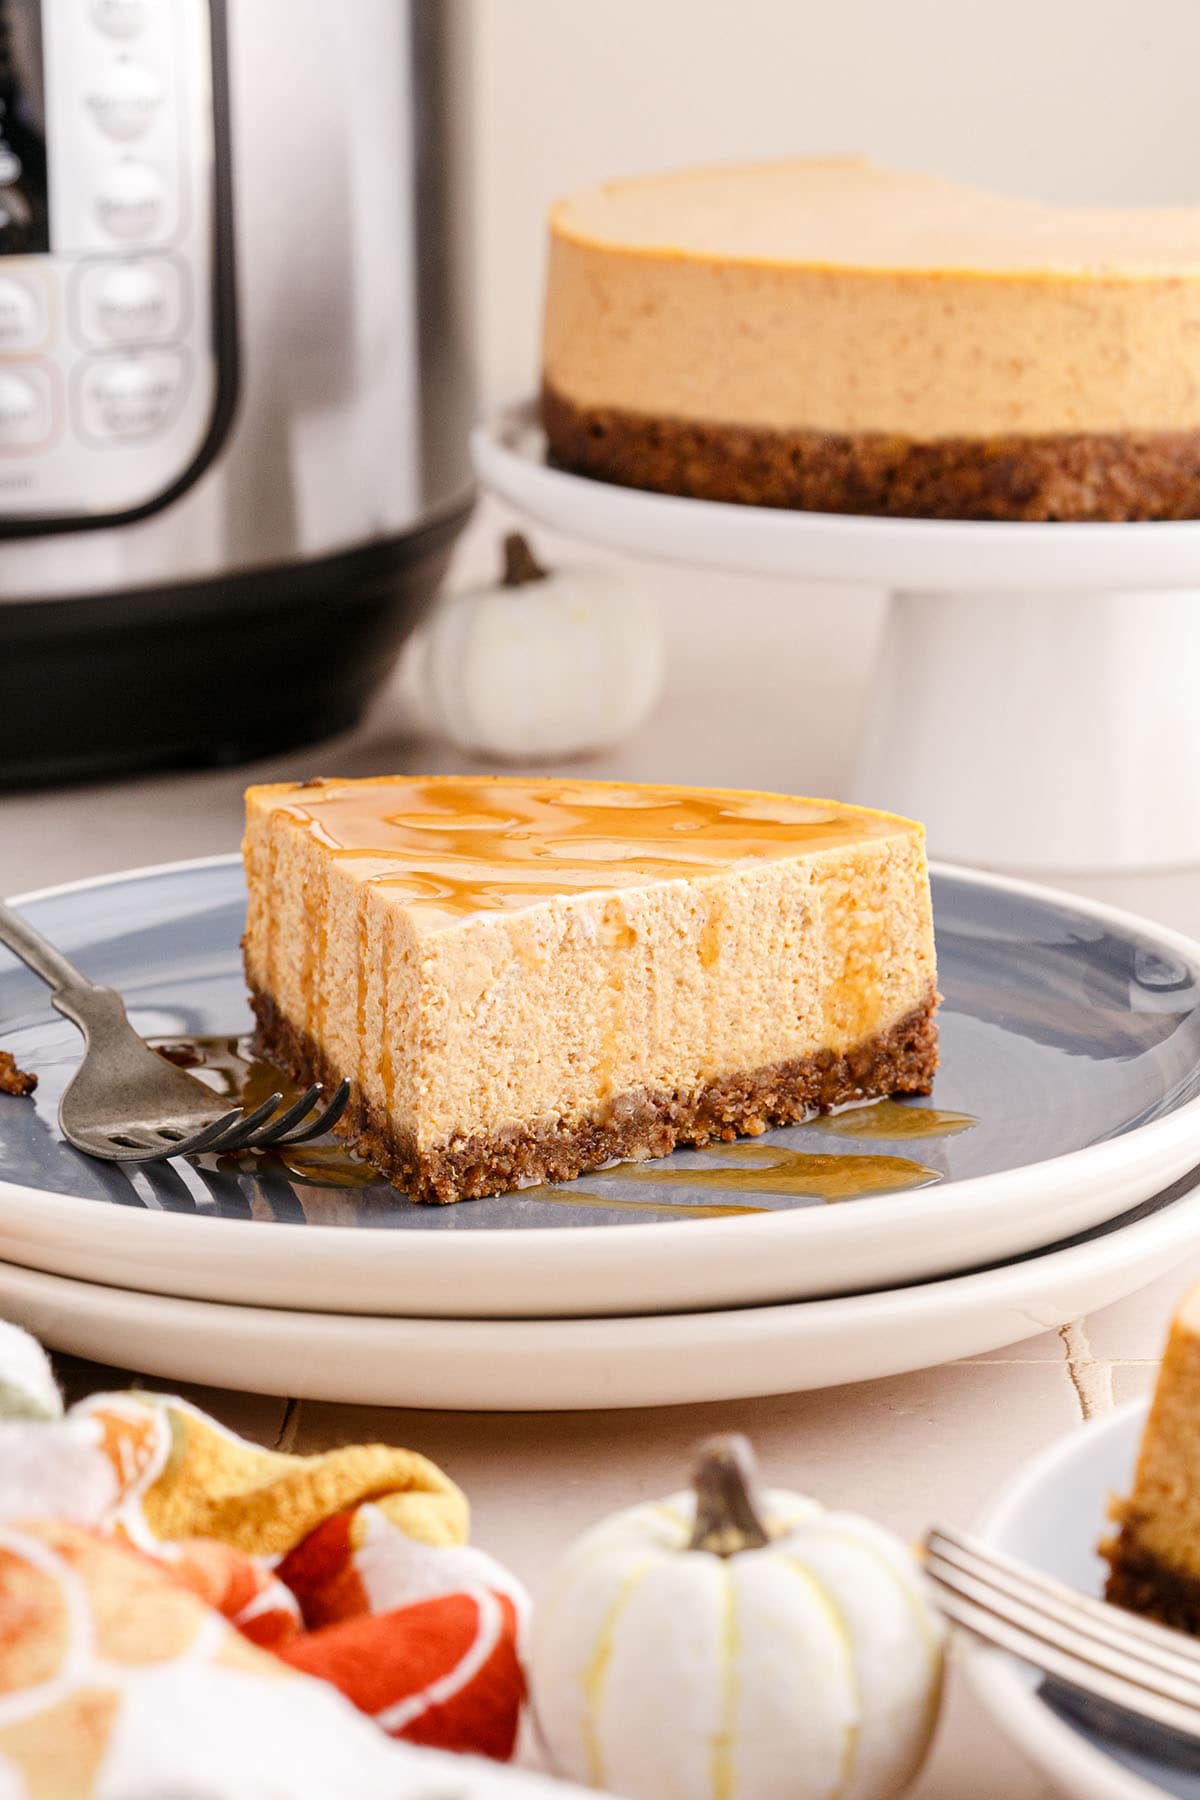
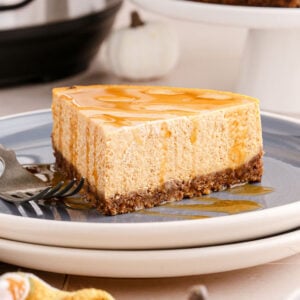
If you like pumpkin pie, you’re going to love this Instant Pot Pumpkin Cheesecake recipe. It has the perfect creamy texture, flavoured with the spices you know and love from pumpkin pie. The pecan graham cracker crust is just a bit sweet with a light crunch. Your tastebuds will do a happy dance.
Pressure cooking is a fantastic way to make cheesecake, because it’s a humid cooking environment, similar to using a water bath when baking in the oven. This moisture helps to prevent cracks on the surface of the cheesecake. We have lots of tips for how to achieve a beautiful, smooth surface throughout the post!
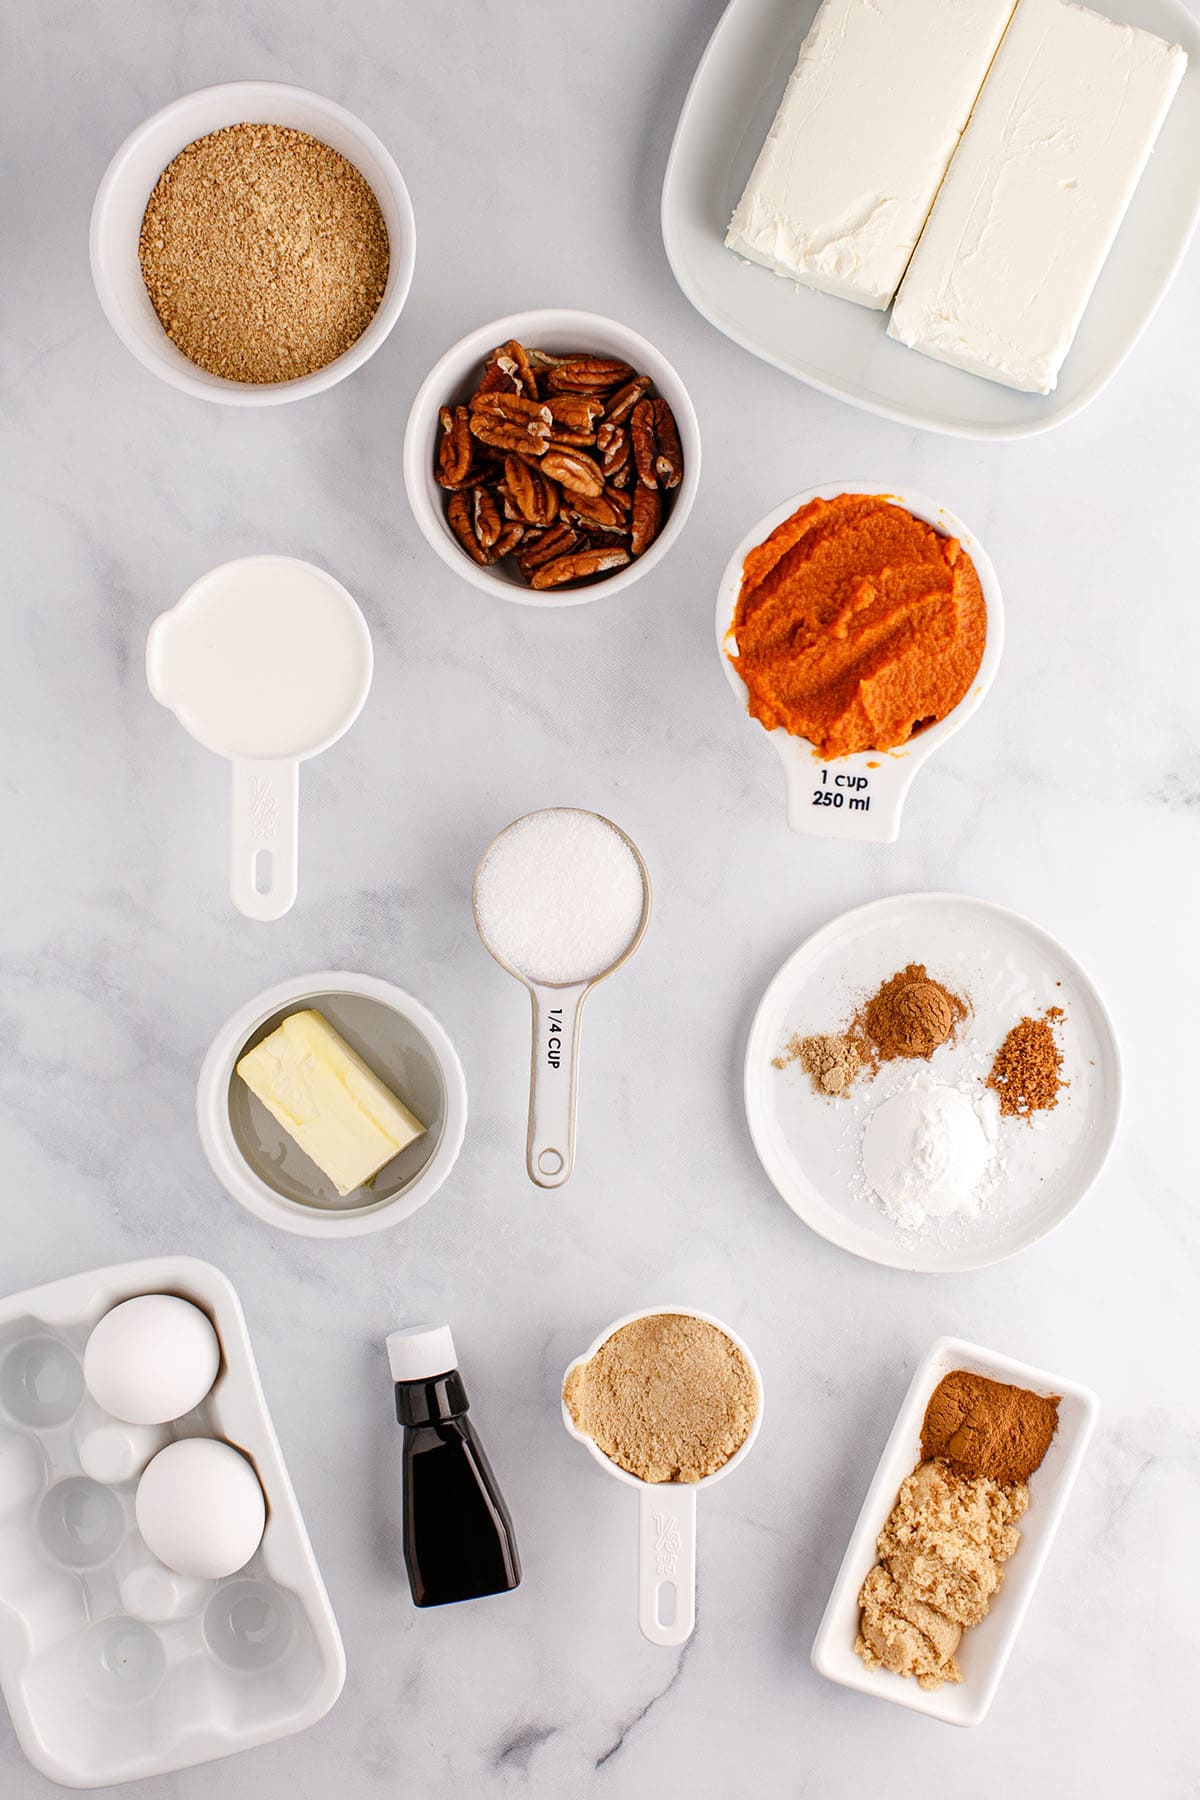
Ingredients
Below is an overview of the ingredients and step-by-step photos for how to make Pumpkin Cheesecake in a pressure cooker. See the recipe card below for details!
For the crust
- Pecans – pulsed in a food processor into fine crumbles
- Graham cracker crumbs – your grocer’s baking section likely has crumbs pre-packaged, or you can make your own by pulsing whole crackers in a food processor, or crushing them with a rolling pin in a large resealable bag.
- Unsalted butter – melted
- Light brown sugar
- Cinnamon
For the filling
- Cream cheese – softened to room temperature; use a full-fat variety for the creamiest result.
- Granulated sugar
- Light brown sugar
- Heavy cream – room temperature
- Pumpkin purée
- Vanilla extract – for flavour
- Cornstarch – added to help prevent cracking
- Spices – cinnamon, nutmeg, ground ginger (no need for store-bought pumpkin pie spice!)
- Pinch of salt
- Large eggs – room temperature
Topping ideas
- Whipped cream
- Caramel drizzle
- Chocolate drizzle
How to make it
Step one: prepare the springform pan
Line the bottom of a 7×3-inch springform pan with foil (optional, but allows for an easier transfer to a cake stand later). Latch the sides to the foil-lined bottom and grease the side with butter or cooking spray.
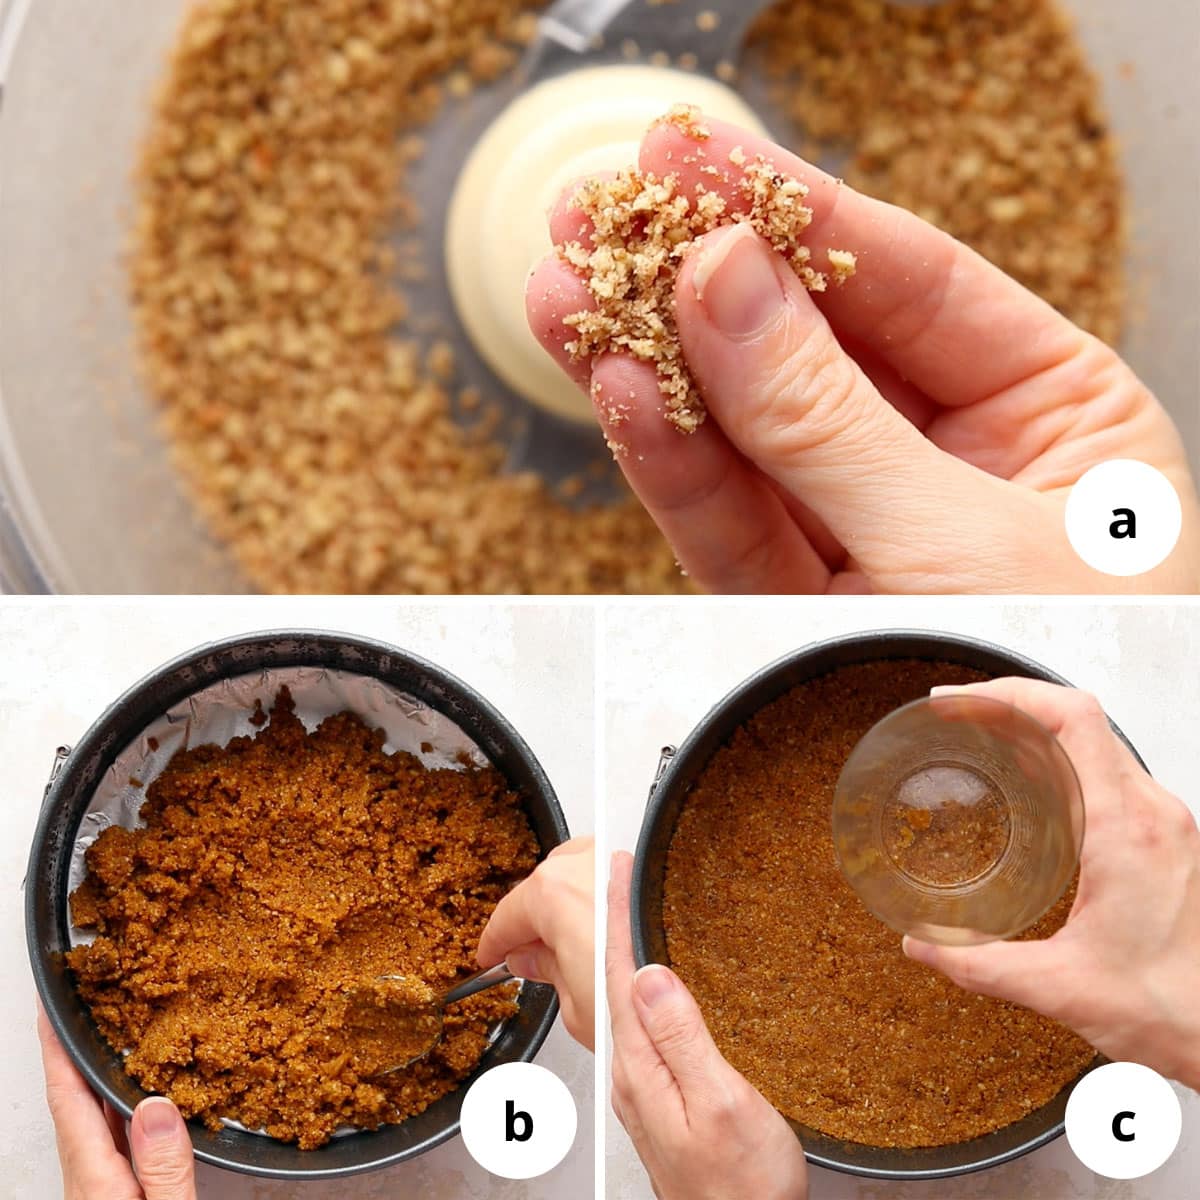
Step two: make the crust
In a food processor, pulse the pecans into fine crumbs (photo a), then transfer them to a medium mixing bowl. Add the graham cracker crumbs, brown sugar and cinnamon and mix until evenly distributed, then mix in the melted butter.
Scoop the mixture into the prepared springform pan and spread it evenly across the bottom (photo b), then use a flat-bottomed cup to press and pack it down to ensure it’s even across the bottom and the edges (photo c).
Place the crust in the freezer for 25 minutes, while you prepare the filling.
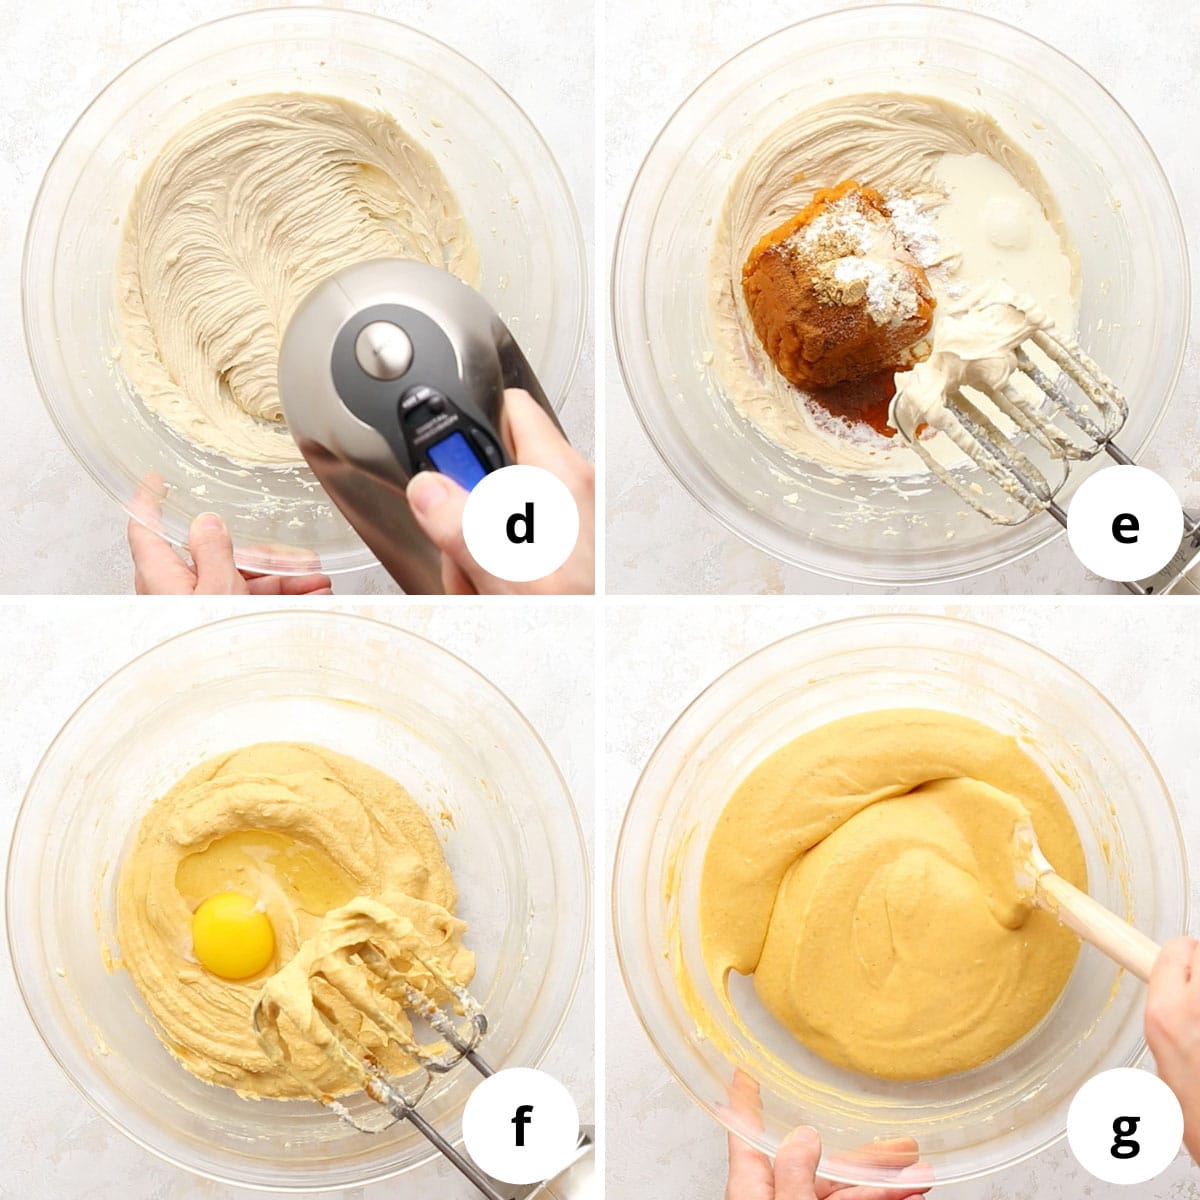
Step three: make the filling
In a large mixing bowl, use a hand mixer on medium speed to beat the softened cream cheese, granulated sugar and brown sugar until smooth (photo d).
Add the pumpkin purée, heavy cream, vanilla extract, cornstarch, cinnamon, nutmeg, ginger and a pinch of salt (photo e). Continue to mix on low-medium speed, using a silicone spatula to scrape down the sides as needed, until smooth and creamy.
Add the room temperature eggs one at a time, mixing on low for no more than 10 seconds each (photo f). Use a silicone spatula to gently fold the batter to ensure the egg is evenly mixed in (photo g). To prevent cracks, do not over mix at this step!
Step four: assemble the cheesecake
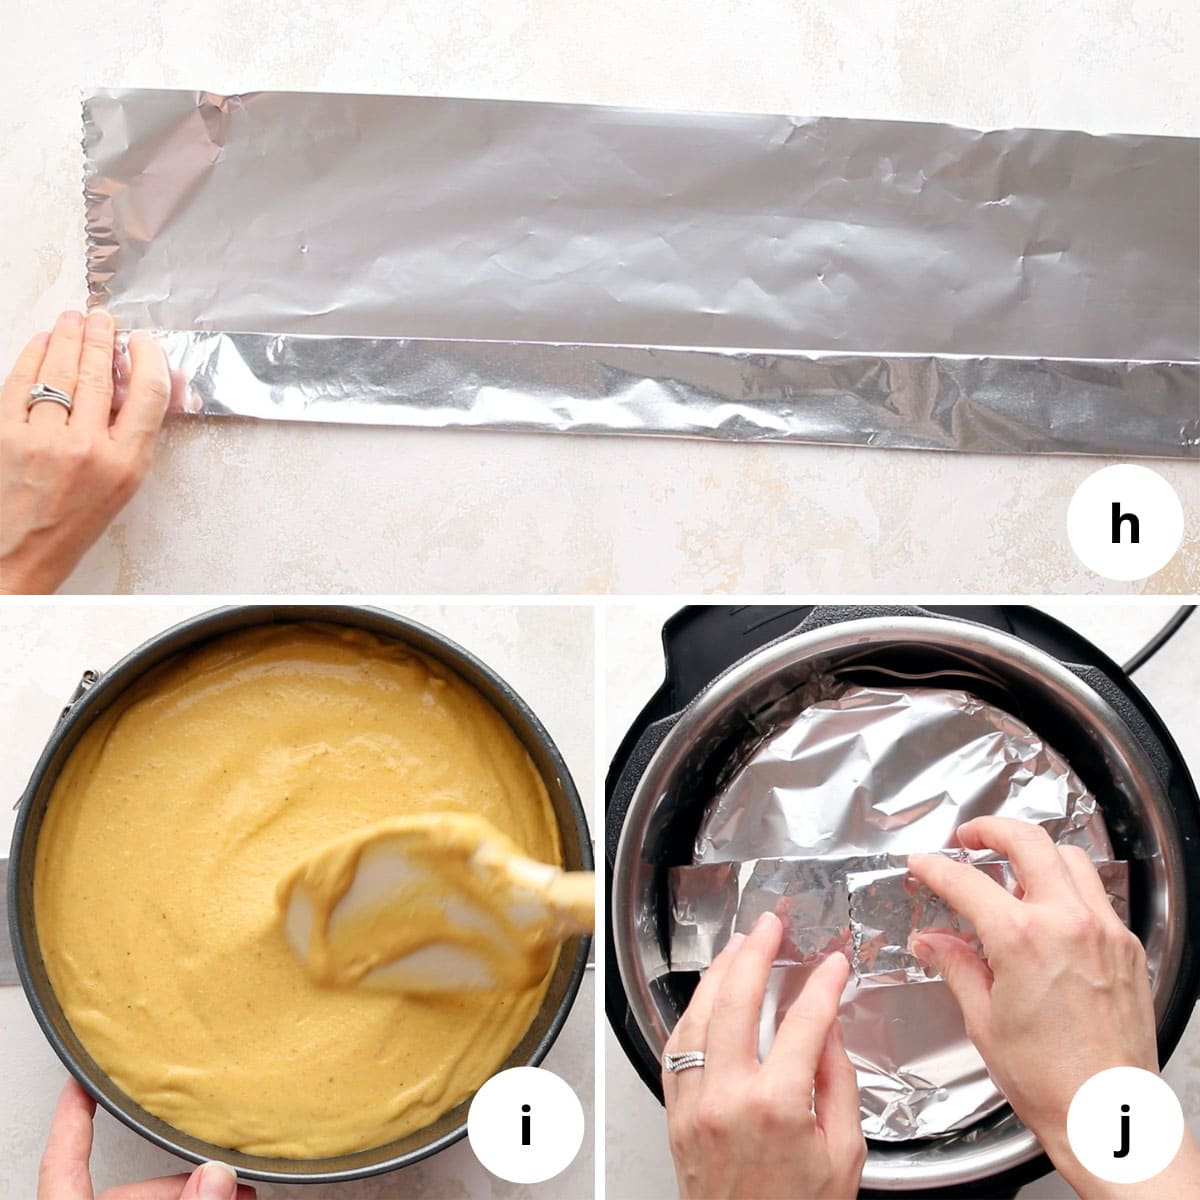
To make it easier to remove the cheesecake from the Instant Pot after cooking, make a foil sling. Tear off a long length of aluminum foil then fold over repeatedly to make a 1.5-inch-wide strip (photo h).
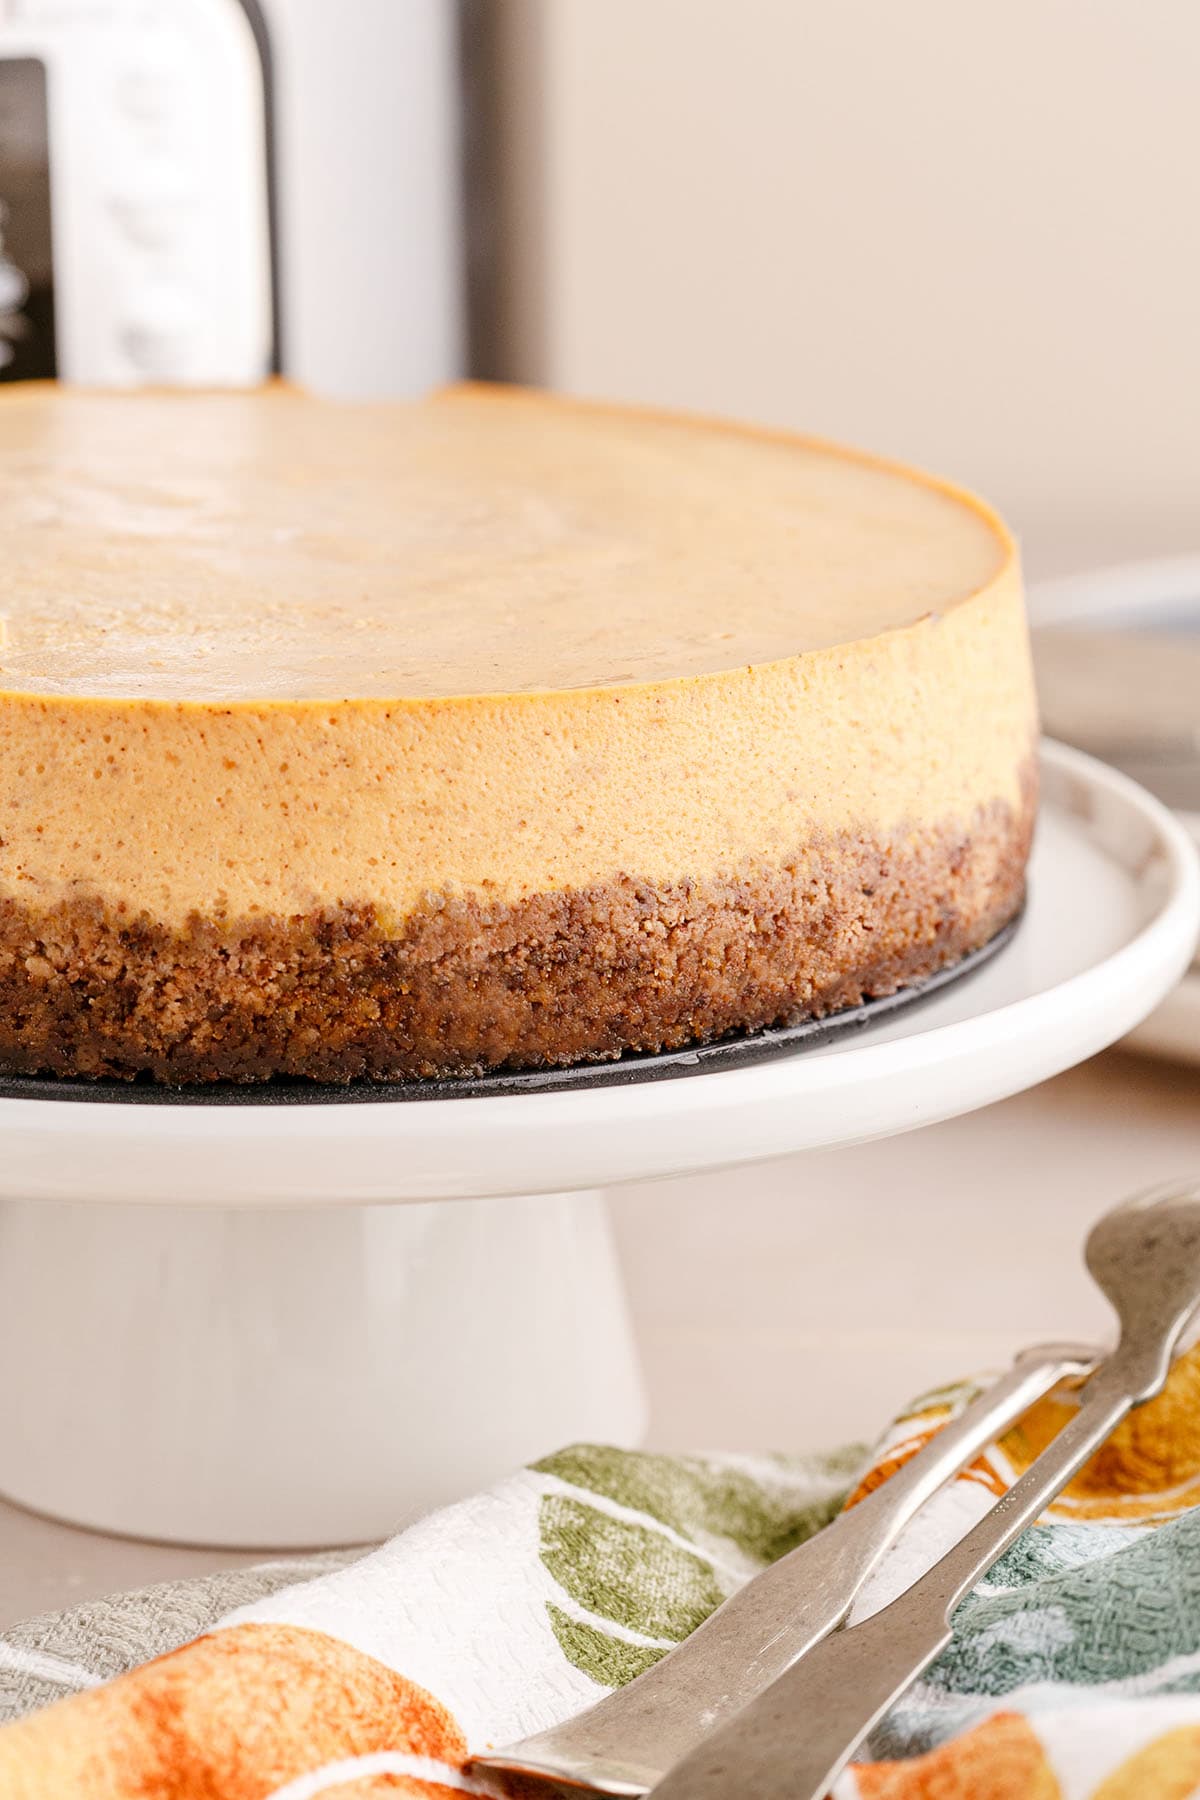
Remove the crust from the freezer and place the pan on the middle of the sling. Pour the filling into the pan and smooth it out with a spatula (photo i). To encourage a smooth surface once it’s cooked, remove large air bubbles in the batter by lightly tapping the pan on the counter (pick it up and drop it from a very short distance). I use a toothpick to pop any bubbles that surface.
Step five: pressure cook
Cover the pan tightly with foil (this helps prevent surface dents from condensation during cooking). Add 1.5 cups of water to the Instant Pot insert, then place the trivet inside. Carefully lower the cheesecake onto the trivet and fold over the ends of the sling (photo j).
Pressure cook on High for 40 minutes, then allow for a full natural release. The pin may drop as soon as 10 minutes after cooking, but I let it sit for a minimum of 20 minutes. Use the handles of the sling to carefully remove the cheesecake from the Instant Pot, place it on a cooling rack and uncover. Let it cool completely to room temperature, for about an hour.
Tip: If you notice any condensation on the top of the cake, you can very carefully remove it with paper towel (try not to actually touch the surface, just use the edge of the paper towel to absorb the moisture).
Step six: chill
Once the cheesecake has cooled to room temperature on the cooling rack, run a thin-bladed knife or offset spatula around the top edge. This will help prevent cracks as the cheesecake continues to cool and settle in the refrigerator. Tightly cover the cheesecake with cling wrap and place it in the refrigerator for 6 to 8 hours, or overnight (my preference).
How to remove cheesecake from a springform pan
After the cheesecake is fully chilled, simply unlatch the side of the pan and carefully lift this piece of the pan straight up. Because we ran a knife around the top edge of the cake before cooling, the cake shouldn’t stick too much to the sides (it will have contracted and settled away from the edge of the pan as it cooled further).
To transfer the cheesecake to a cake stand, unwrap the foil from around the bottom of the pan, lift the foil and cheesecake away from the pan and place it onto your serving surface. Gently slide the foil out from under the cake. If you didn’t use the foil, you may find it easier just to leave the cake on the bottom part of the pan.
Tips for Success
Cheesecake can be a bit intimidating if you’ve never made one before, but if you follow this recipe and the tips below, you’ll be so pleased with the result.
1. Use room temperature ingredients. This is an absolute must if you want a smooth and creamy cheesecake! Be sure the cream cheese, heavy cream and eggs are at room temperature before mixing.
2. Wrap the bottom of the springform pan with foil. This is optional, but allows for an easier transfer to a cake stand.
3. Don’t over-pack the crust. You want it evenly packed down, but don’t press too hard. If it’s too packed it becomes harder to slice nicely.
4. Add the eggs last and don’t over mix. Over mixing the eggs is a common reason for cracked cheesecake, because they can trap air inside the filling. Mix on low speed with your hand mixer for no more than 10 seconds once you add each egg, then use a silicone spatula to gently fold the filling to make sure it’s evenly combined.
5. Tap the pan on the counter before cooking. This will help bring any large air bubbles to the surface to be popped.
6. Allow for a 20-30 minute Natural Pressure Release (NPR). The pin will drop sooner, but allowing the cheesecake to cool gradually helps prevent surface cracks.
7. Run a thin knife along the edge of the cheesecake before refrigerating. This will help to prevent cracks as the cheesecake cools and contracts away from the edge of the pan.
How to store cheesecake
To refrigerate: Cover the cake tightly with cling wrap, or slice and place in air tight containers, and put in the refrigerator. Eat within 4 days.
To freeze: Leave the cake on the bottom of the pan or transfer it to a cardboard round. Wrap it tightly with cling wrap, then foil, then place it in a freezer bag. For best results, freeze for no more than a month.
To thaw: Leaving the plastic wrap on, place the cheesecake in the refrigerator overnight. I like to bring it out of the refrigerator about 30 minutes before slicing and serving.
Frequently Asked Questions
This recipe requires a 7×3-inch pan. Be sure it’s 3 inches tall. Some of the Instant Pot accessory kits come with springform pans that are only about 2 inches tall. I use the Instant Pot official springform. This push pan will also work.
No! I’ve used parchment in the past and found it caused unattractive marks in the edges of my cheesecake. A non-stick pan that is well greased is all you need!
Yes! You can use gluten-free graham crackers and make your own crumbs by pulsing them in a food processor. Check that your cornstarch is certified gluten free (cornstarch itself is gluten free, but some brands may be processed in a facility that has gluten products). The remaining ingredients are gluten free.
Use a knife with a thin blade and run it under hot water and wipe clean before each cut. You’ll get perfect edges!
More delicious pumpkin recipes
- Instant Pot Pumpkin Turkey Chili
- Pumpkin Breakfast Cookies
- Pumpkin Spice Baked Oatmeal
- Thai Pumpkin Curry
⭐️⭐️⭐️⭐️⭐️ If you enjoyed this recipe, please leave a review below! You can also subscribe to my newsletter and follow on Facebook, Instagram and TikTok to see the latest recipes and meal inspiration!
Instant Pot Pumpkin Cheesecake
Click stars to rate now! ↑
Ingredients
For the crust
- ¾ cup pecans (75g)
- ¾ cup graham cracker crumbs (120g)
- ¼ cup unsalted butter, melted (57g)
- 1 tablespoon light brown sugar
- 2 teaspoons ground cinnamon
For the filling
- 10 ounces cream cheese, softened (283g)
- ¼ cup granulated sugar (50g)
- ¼ cup light brown sugar (55g)
- 1 cup canned pumpkin purée (260g)
- ½ cup heavy cream, room temperature (120ml)
- 2 teaspoons vanilla extract
- 1 tablespoon cornstarch
- ½ teaspoon ground cinnamon
- ½ teaspoon ground nutmeg
- ¼ teaspoon ground ginger
- Pinch of salt
- 2 large eggs, room temperature
For Serving (optional)
- whipped cream
- caramel sauce
- chocolate sauce
Instructions
- Prepare the pan. Wrap the bottom of a 7×3-inch springform pan with aluminum foil (optional, but allows for for easier transfer to a cake stand) then attach the sides of the pan. Use butter or non-stick spray to grease the sides. Set aside.
- Make the crust. In a food processor, pulse the pecans into a fine crumble, then transfer to a medium mixing bowl. Add the graham cracker crumbs, brown sugar and cinnamon. Mix until well combined, then add the melted butter and continue to mix until the crumbs are evenly coated in butter.
- Freeze the crust. Transfer the crust mixture to the prepared springform pan and spread it out in an even layer. Use a flat-bottomed cup to gently press and pack it down to ensure it's even across the bottom and the edges. Place in the freezer for 25 minutes.
- Make the filling. In a large bowl, use a hand mixer on medium speed to beat the softened cream cheese, granulated sugar and brown sugar, until smooth. Add the pumpkin purée, heavy cream, vanilla, cornstarch, cinnamon, nutmeg, ginger and salt. Continue to mix on low-medium speed until smooth and creamy, scraping down the sides as needed.
- Add the eggs. Add the room temperature eggs one at a time, mixing on low speed for no more than 10 seconds after each. Use a silicone spatula to gently fold the filling to ensure it's evenly mixed. Do not over mix at this step!
- Assemble the cheesecake. Remove the crust from the freezer and pour the filling into the pan. Spread the filling out evenly, then gently tap the pan on the counter to encourage any large air bubbles to come to the surface to be popped. Cover the pan tightly with aluminum foil.
- Make a sling. For easier removal from the Instant Pot, use a sling underneath the springform pan. Tear off a long length of foil and fold it into a 1.5-inch-wide strip.
- Pressure cook. Pour in 1.5 cups of water into the Instant Pot insert, then add the trivet. Place the pan on top of the foil sling, then carefully lower the pan and sling onto the trivet. Tuck the ends of the sling over the foil cover. Close the lid, set the valve to sealing and pressure cook on Manual High pressure for 40 minutes (your Instant Pot model may have a "Pressure Cook" button rather than a "Manual" button). At the end of cooking time, allow pressure to release naturally for 20 minutes (the pin may drop before this, but let it sit).
- Cool and chill. Use the sling to carefully lift the pan out of the Instant Pot and place it on a cooling rack. Uncover and let it cool to room temperature, for about an hour. Use a thin knife or offset spatula to scrape around the top edge (this will help prevent cracks as it cools and contracts further while in the refrigerator), then cover with cling wrap and place in the refrigerator overnight (minimum 6-8 hours).
- Serve. While the cheesecake is cold from the fridge, gently unlatch and lift up the sides of the pan. Transfer the cake to a cake stand, if desired (see post for tips). For clean slices, run your knife under hot water and wipe clean between each cut. Serve with your favourite toppings. Store any leftovers covered in the refrigerator for up to 4 days.
Notes
- To refrigerate: Cover the cake tightly with cling wrap, or slice and place in air tight containers, and put in the refrigerator. Eat within 4 days.
- To freeze: Leave the cake on the bottom of the pan or transfer it to a cardboard round. Wrap it tightly with cling wrap, then foil, then place it in a freezer bag. For best results, freeze for no more than a month.
- To thaw: Leaving the plastic wrap on, place the cheesecake in the refrigerator overnight. I like to bring it out of the refrigerator about 30 minutes before slicing and serving.
- This recipe was tested in both a 6-quart and 8-quart Instant Pot models.
Nutrition Estimate
Did you make this recipe?
Please leave a review below and share your results!

Hey, I’m Laura!
Creator of The Recipe Well
If you’re looking for easy meals and Instant Pot recipes, you’re in the right place! I use my nutrition degree to create simple, approachable recipes that will help you find your happy place in the kitchen.


This was my first pumpkin dessert of the season. I wanted to test it out before Thanksgiving and it’s SO GOOD. 100% recommend.
Turned out perfectly! Thank you for such detailed instructions. Will definitely make again.
So happy you enjoyed it! Thanks for leaving a review!
Thanks for a delicious recipe. I’ll need to cut back on the crust about 1/3. It was too thick for my taste. I used the dessert setting (lower power setting)on my instant pot and I had to redo at a higher setting. Tasted awesome! Thanks! Can’t wait to try it again
Hi Kathy, yes, you definitely need the High pressure setting for this recipe. So glad you enjoyed it!